
Loop and Branch
Branching is a fundamental feature of computers. For example, branching allows a computer to repeat instruction sequences. One of the most basic forms of repetition is a “loop”, and the loop is probably the most widely used programming technique.
There are two type of branches, unconditional and conditional. An unconditional branch is basically a JUMP. We briefly discussed jumping here. In this tutorial we will examine loops utilizing conditional branches.
Not Equal
Basic loops in the C language use the “for” construct. Here is a very simple countdown for loop in C that repeats 8 times:
for (i=8; i>0; i--) {

//repeat instructions located here...

}
Let’s duplicate the above C language loop with inline assembler:
volatile uint8_t counter = 8;

asm (
    "1:         \n"
    "nop        \n" //repeating code goes here
    "dec %1     \n"
    "brne 1b    \n"
    : : "r" (counter)
  );
}
First, please note, we’re not performing any function(s) inside the body of this loop, with the exception of killing time with a NOP. Obviously, in an actual loop we would replace the NOP with some sort of functional code.
Second, notice how we decrement the counter value and then use the instruction BRNE (BRanch if Not Equal) to loop back to the label ‘1‘ location. We add ‘b’ to the label to inform the assembler we are branching to a label located “before” the current instruction. If the label was after the branch instruction, we would be branching “forward”, and use “1f” instead of “1b“.
BRNE is a conditional relative branch. It tests the Zero flag (Z) of the Status Register (SREG) and branches if the Z flag is cleared. When the counter value is decremented to 0, the Zero flag is set, and the branch doesn’t occur. Therefore, this loop executes 8 times.
Finally, the counter value (counter) must be pre-loaded with the number of loop iterations. If counter was zero when this inline code starts to execute, then the loop will iterate 255 times! Which leads us to ask, how can we get a loop to repeat more than 255 times?
Nesting
One possible solution is to nest loops. Placing a loop inside of another loop would allow up to 255 * 255, or 65,025 iterations. Alternatively, more iterations of the loop could use a 16-bit or 32-bit integer as the loop counter (see our delay example at the end of this post).
Here is an example of a nested loop:
volatile uint8_t outer = 0xff;
volatile uint8_t inner = 0xff;

asm (

  "1:                  \n" //outer loop
  "mov __tmp_reg__, %0 \n" //(re)load inner loop counter

  "2:                  \n" //inner loop
                           //perform stuff here...

  "dec __tmp_reg__     \n" //DEC inner loop counter
  "brne 2b             \n" //branch to '2' if tmp_reg not 0

  "dec %1              \n" //DEC outer loop counter
  "brne 1b             \n" //branch to '1' if "outer" not 0

  : : "r" (inner), "r" (outer)
);
More Branches
Prior to a branch instruction, there must be an operation which sets a flag in the Status Register (SREG). In the above examples we used the DEC instruction to perform this operation. However, there are several methods for setting flags, for example: INC, DEC, ADD and SUB work just as well. We can also conduct simple comparisons and tests. Keep in mind, probably the two most widely used comparison instructions are CP and CPI.
CP, CPI, CPC, CPSE and TST are explicitly designed for this purpose.
As you may have guessed, there are many more branch instructions beside just BRNE. We can branch if equal (BREQ), if same or higher (BRSH), if lower (BRLO), if carry is clear (BRCC), or carry set (BRCS). Also, one must be careful to use the appropriate instruction when comparing signed (vs. unsigned) values.
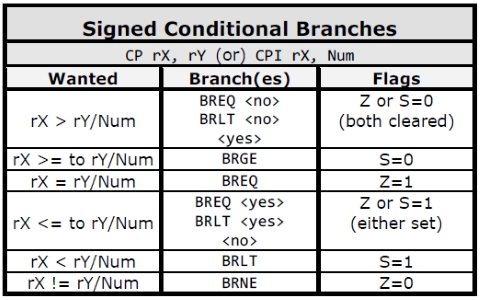
As noted above, its important to realize that comparisons involving both signed and unsigned values require different branch instructions. Unsigned values are between 0 and 255, and signed values are between -128 and 127. The following two tables summarize the comparisons and branch instructions in order to accomplish a desired result. Notice that a few of the comparison require the use of two branch instructions.
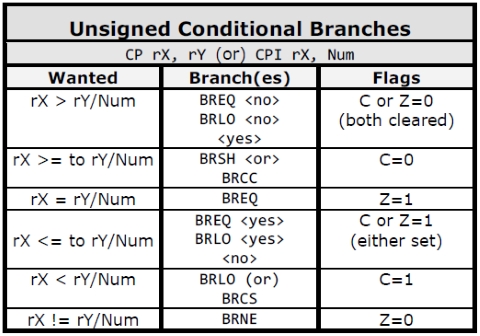
The comparison instructions operate like a subtraction (without saving the result). Therefore, these tables are valid to subtraction operations as well.
Practically Speaking
Lets look at a few practical, yet simple examples (isspace, isdigit, and isalpha functions). These are all standard C library functions defined inside the “ctype.h” header file. They all take an ASCII integer char as input and return an integer. Take note however, our perverted versions accept and return a char-sized parameter.
A Space
The standard C function isspace(c) returns true for the standard “white-space” characters listed below:
' ' (0x20)
'\t' (0x09)
'\n' (0x0a)
'\v' (0x0b)
'\f' (0x0c)
'\r' (0x0d)
Our isspace function only detects a space character, ‘ ‘ (0x20). In this code we demonstrate the use of the BREQ instruction:
uint8_t _isspace(unsigned char c) {
  uint8_t result;

  asm (
    "cpi  %1, ' '  \n"
    "breq 1f       \n" //branch if equal
    "clr  %0       \n" //false
    "rjmp 2f       \n"
    "1: ldi  %0, 1 \n" //true
    "2:            \n" //exit
    : "=r" (result) : "r" (c)
  );

  return result;
}
Going Digital
The standard C function isdigit(c) returns true for the characters ‘0’ (0x30) through ‘9’ (0x39) along with the negative sign ‘-‘ (0x2d). Our function only detects digits, and neglects the negative sign. This code demonstrates the use of the BRMI and BRPL instructions:
uint8_t _isdigit(unsigned char c) {
  uint8_t result;

  asm (
    "subi %1, 0x30 \n"
    "brmi 2f       \n" //branch if minus
    "subi %1, 10   \n"
    "brpl 2f       \n" //branch if plus
    "ldi  %0, 1    \n" //true
    "rjmp 3f       \n"
    "2: clr  %0    \n" //false
    "3:            \n" //exit
    : "=r" (result) : "r" (c)
  );

  return result;
}
Alphabet Soup
The standard C function isalpha(c) returns true for the characters ‘a’ (0x61) through ‘z’ (0x7a), and ‘A’ (0x41) through ‘Z’ (0x5a). Our function does the same. This code demonstrates the use of the BREQ and BRPL instructions:
uint8_t _isalpha(unsigned char c) {
  uint8_t result;

  asm (
    "sbrs %1, 6     \n" //check bit 6
    "rjmp 1f        \n" //bit 6 is clear, cannot be alpha
    "andi %1, ~0x60 \n" //clear bit 5&6
    "breq 1f        \n" //0 cannot be alpha
    "subi %1, 27    \n" //26 letters
    "brpl 1f        \n" //>z cannot be alpha
    "ldi %0, 1      \n" //true
    "rjmp 2f        \n"
    "1: clr  %0     \n" //false
    "2:             \n" //exit
    : "=r" (result) : "r" (c)
  );

  return result;
}
Labels
Previously we showed how to use numbers as labels. There are other valid methods. A problem arises when reusing macros using labels. In such cases you may make use of the special pattern %=, which is replaced by a unique number in each asm statement’s block of code. The following code had been taken from avr/include/iomacros.h:
#define loop_until_bit_is_clear(port,bit) \
  asm (                                   \
    "L_%=:       \n"                      \
    "sbic %0, %1 \n"                      \
    "rjmp L_%=   \n"                      \
    : : "I" (_SFR_IO_ADDR(port)), "I" (bit))
For example, when used for the first time, L_%= may be translated to L_1404, the next usage might create L_1405 or whatever. In any case, the labels become unique.
Another option is to use actual names for the labels. The above example would then look like:
#define loop_until_bit_is_clear(port,bit) \
  asm (                                   \
    "start:      \n"                      \
    "sbic %0, %1 \n"                      \
    "rjmp start  \n"                      \
    : : "I" (_SFR_IO_ADDR(port)), "I" (bit))
Wait, One More Thing
Finally, an assembly language tutorial series without a home-grown version of a delay routine would be like a swimming pool without water. Here is where we present our version.
The following code produces approximately a 1 second delay on a 16Mhz Arduino. The included C language MACROs allow adapting this code for other delay periods. Take note, this code does not load the MSB of the 32-bit “DELAY_VALUE“, so a delay longer than ~1.048 seconds (DELAY_VALUE larger than 0x00ffffff) would require a slight modification (by now, you should be able to handle that). Also, take note of the label name we use:
#define CLOCK_MHZ       16UL
#define DELAY_LENGTH_MS 1000UL
#define DELAY_VALUE     (uint32_t)((CLOCK_MHZ * 1000UL * DELAY_LENGTH_MS) / 5UL)

asm (
"loop:          \n"
  "subi %A2, 1  \n"
  "sbci %B2, 0  \n"
  "sbci %C2, 0  \n" //note: 1 byte short of full 32-bits
  "brcc loop    \n"
  : : "r" (DELAY_VALUE)
);
References
AVR Branch Instructions
AVR 8-bit Instruction Set
AVR-GCC Inline Assembler Cookbook
Extended Asm – Assembler Instructions with C Expression Operands
Accurate Delay Code Example
[updated: 3/28/2016]
Also available as a book, with greatly expanded coverage!

[click on the image]

Very nice! Just a typo to correct: in your example “Nesting” you confused the labels, branches, and comments of the inner and outer loop. This is a serious problem since this is the only example with backward branches and it is not obvious if e.g. “1b” goes back to the closest label (which is “2:”) or simply to label “1:”.
Thanks, I’ve corrected the comments in the program.